前两天做了一个过渡动画,为了防止忘记,在这记录一下如何做。
基本概念
UIViewControllerTransitioningDelegate
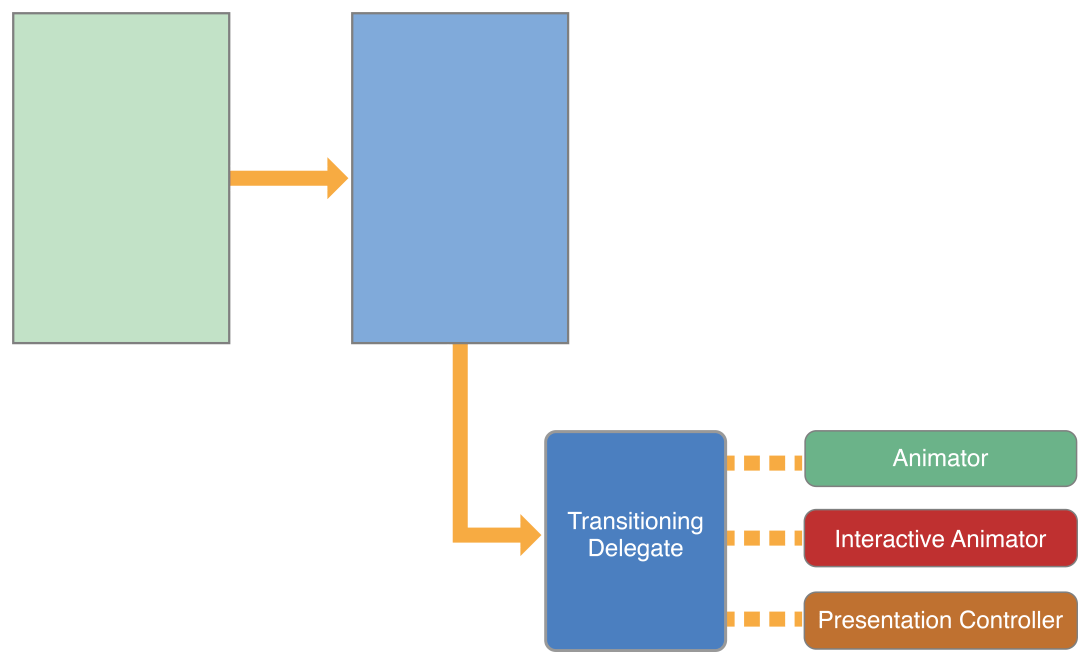
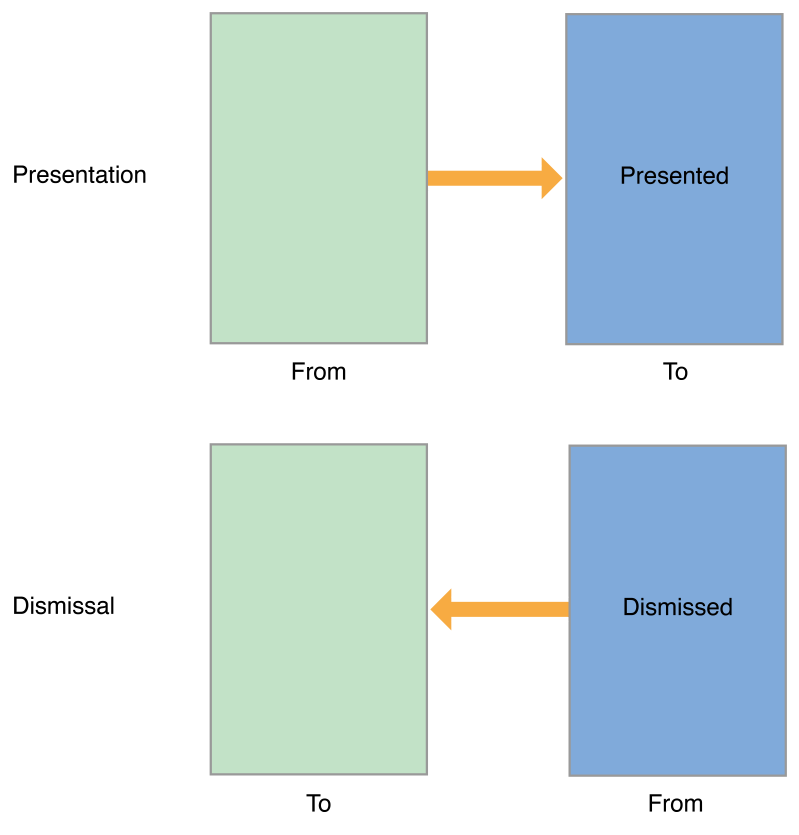
如图所示,其中绿色的表示from VC,蓝色的表示to VC,通过to VC的方法setTransitioningDelegate:来设置其过渡动画的代理,这个代理需要符合UIViewControllerTransitioningDelegate协议,这个协议提供了做动画需要的animator(这个可以是交互式动画,也可以是非交互式动画)和presentation controller。
Animator:主要做动画的部分都在这里实现,比如动画时间,怎么做等。非交互动画的animator需要遵守UIViewControllerAnimatedTransitioning协议;交互动画同时还要遵守UIViewControllerInteractiveTransitioning。你可以对present和dismiss分别提供相应的animator。
Presentation controller:modalPresentationStyle为UIModalPresentationCustom时,UIKit就会查找自定义的UIPresentationController,此时我们就可以提供一个自定义的来控制其形为;当modalPresentationStyle不为UIModalPresentationCustom时,系统会提供内部已经定义好的UIPresentationController。其作用在下面有说明。
Transitioning Contexts:定义了动画需要的一些元数据,比如动画涉及的VC等。 这些对象需要遵守 UIViewControllerContextTransitioning这个协议,一般来说,这个是由系统创建提供的。以参数形式提供给animator使用。
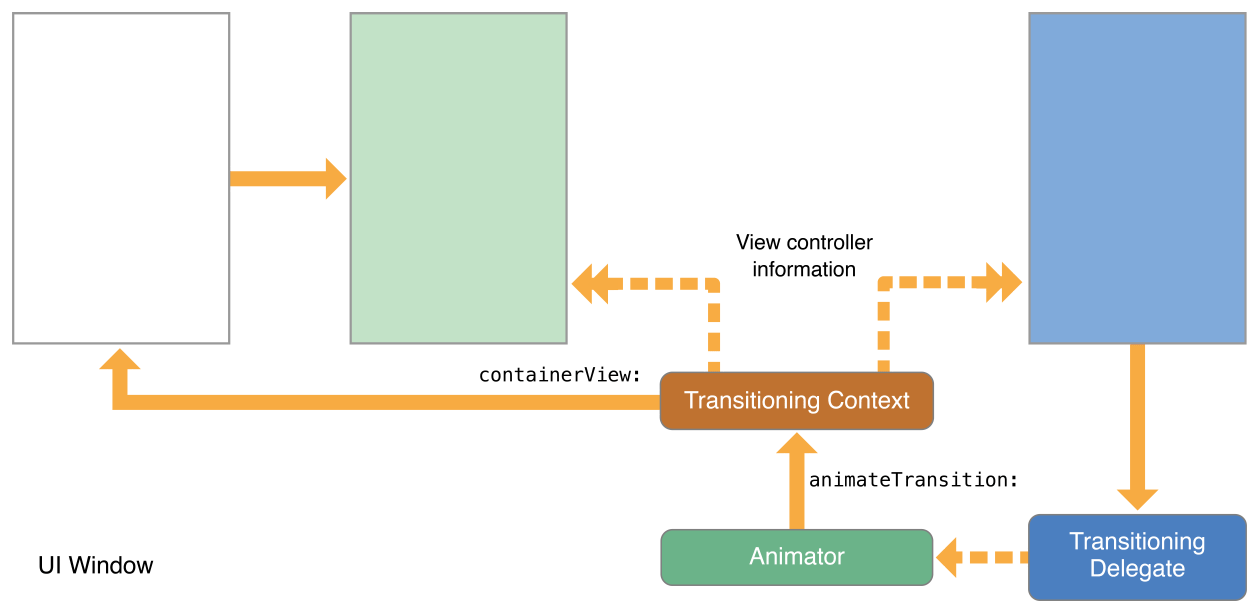
Transition Coordinators:提供了在做Transition动画的同时,做其它动画的功能,遵循 UIViewControllerTransitionCoordinator 协议。
present的调用顺序
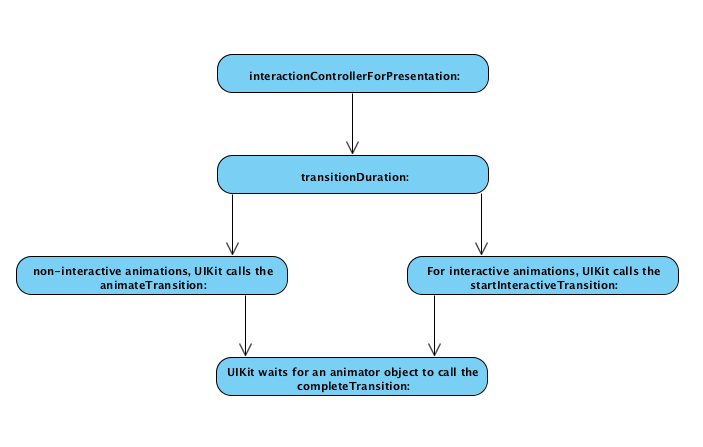
UIKit调用animationControllerForPresentedController:presentingController:sourceController:得到animator,然后如图:
dismiss的调用顺序
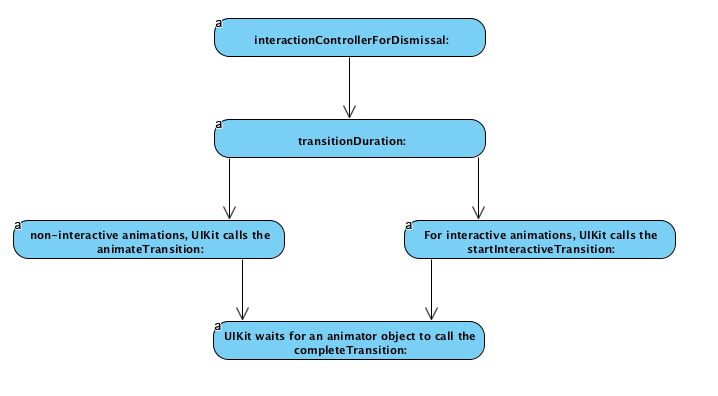
UIKit调用 animationControllerForDismissedController: 得到animator,然后如图:
实现自定义Animator
得到动画参数
使用viewControllerForKey: 得到from VC、to VC。
使用containerView得到动画的“容器”。
使用viewForKey:得到要添加或删除的view。
使用finalFrameForViewController:得到VC的最终位置。
做动画
这里提供一个例子:
-(NSTimeInterval)transitionDuration:(id<UIViewControllerContextTransitioning>)transitionContext {
    return self.transitionDuration;
}

- (void)animateTransition:(id<UIViewControllerContextTransitioning>)transitionContext {
    // Get the set of relevant objects.
    UIView *containerView = [transitionContext containerView];
    UIViewController *fromVC = [transitionContext
            viewControllerForKey:UITransitionContextFromViewControllerKey];
    UIViewController *toVC   = [transitionContext
            viewControllerForKey:UITransitionContextToViewControllerKey];

    UIView *toView = [transitionContext viewForKey:UITransitionContextToViewKey];
    UIView *fromView = [transitionContext viewForKey:UITransitionContextFromViewKey];

    // Set up some variables for the animation.
    CGRect containerFrame = containerView.frame;
    CGRect toViewStartFrame = [transitionContext initialFrameForViewController:toVC];
    CGRect toViewFinalFrame = [transitionContext finalFrameForViewController:toVC];
    CGRect fromViewFinalFrame = [transitionContext finalFrameForViewController:fromVC];

    // Set up the animation parameters.
    if (self.presenting) {
        // Modify the frame of the presented view so that it starts
        // offscreen at the lower-right corner of the container.
        toViewStartFrame.origin.x = containerFrame.size.width;
        toViewStartFrame.origin.y = containerFrame.size.height;
    }
    else {
        // Modify the frame of the dismissed view so it ends in
        // the lower-right corner of the container view.
        fromViewFinalFrame = CGRectMake(containerFrame.size.width,
                                      containerFrame.size.height,
                                      toView.frame.size.width,
                                      toView.frame.size.height);
    }

    // Always add the "to" view to the container.
    // And it doesn't hurt to set its start frame.
    [containerView addSubview:toView];
    toView.frame = toViewStartFrame;

    // Animate using the animator's own duration value.
    [UIView animateWithDuration:[self transitionDuration:transitionContext]
                     animations:^{
                         if (self.presenting) {
                             // Move the presented view into position.
                             [toView setFrame:toViewFinalFrame];
                         }
                         else {
                             // Move the dismissed view offscreen.
                             [fromView setFrame:fromViewFinalFrame];
                         }
                     }
                     completion:^(BOOL finished){
                         BOOL success = ![transitionContext transitionWasCancelled];

                         // After a failed presentation
                         if ((self.presenting && !success)) {
                             [toView removeFromSuperview];
                         }

                         // Notify UIKit that the transition has finished
                         [transitionContext completeTransition:![transitionContext transitionWasCancelled]];
                     }];

}

- (void)animationEnded:(BOOL)transitionCompleted {
    NSLog("transition end");
}
顺带一提,如果要实现一个交互式的animator,最简单的办法是使用一个UIPercentDrivenInteractiveTransition对象。
Presenting a View Controller Using Custom Animations
我们需要以下步骤:
- 创建要呈现的VC
- 创建自定义transitioning delegate对象,将它赋值给上述VC的
transitioningDelegateproperty - 调用
presentViewController:animated:completion:呈现上述VC
做transition动画的同时做其它动画
通过相应VC的transitionCoordinator属性得到这个Transition Coordinator,然后调用它的animateAlongsideTransition:completion: 或 animateAlongsideTransitionInView:animation:completion:来在transition的同时做其它动画的目的。
UIPresentationController
使用UIPresentationController可以达到下述目的:
- 设置presented view controller的大小
- 在动画时加入自定义的view
- 可以对加入的自定义的view做动画
- 适配
工作顺序
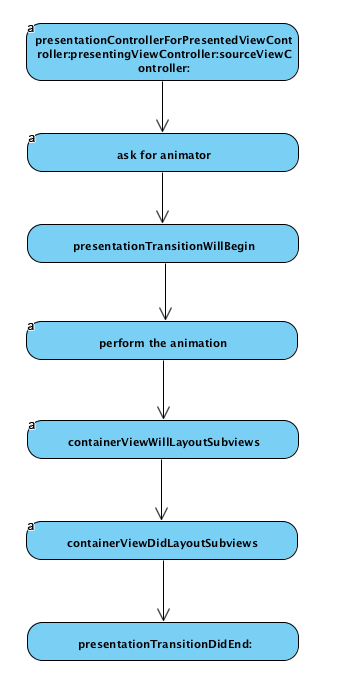
Presentation Controller在动画中的调用顺序如下图,dismiss时只是begin和end调用的函数分别换为dismissalTransitionWillBegin和dismissalTransitionDidEnd:。
定义自己的UIPresentationController
首先,我们应该考虑如下问题:
- 想加入何种view?
- 通过什么动画将view加到屏幕上?
- presented VC的最终大小?
- 屏幕转动时的动画?size 改变时的适配?
- 当动画做完时,presenting VC的view是否应该移除?
我们可以通过override frameOfPresentedViewInContainerView来控制presented VC的最终大小。
class SlideInPresentationController: UIPresentationController {
  // MARK: - Properties
  fileprivate var dimmingView: UIView!
  private var direction: PresentationDirection

  init(presentedViewController: UIViewController, presenting presentingViewController: UIViewController?, direction: PresentationDirection) {
    self.direction = direction

    super.init(presentedViewController: presentedViewController, presenting: presentingViewController)
    setupDimmingView()
  }

  override func presentationTransitionWillBegin() {
    containerView?.insertSubview(dimmingView, at: 0)

    NSLayoutConstraint.activate(NSLayoutConstraint.constraints(withVisualFormat: "V:|[dimmingView]|", options: [], metrics: nil, views: ["dimmingView": dimmingView]))
    NSLayoutConstraint.activate(NSLayoutConstraint.constraints(withVisualFormat: "H:|[dimmingView]|", options: [], metrics: nil, views: ["dimmingView": dimmingView]))

    guard let coordinator = presentedViewController.transitionCoordinator else {
      dimmingView.alpha = 1.0
      return
    }

    coordinator.animate(alongsideTransition: { _ in
      self.dimmingView.alpha = 1.0
    }, completion: nil)
  }

  override func dismissalTransitionWillBegin() {
    guard let coordinator = presentedViewController.transitionCoordinator else {
      dimmingView.alpha = 0.0
      return
    }

    coordinator.animate(alongsideTransition: { _ in
      self.dimmingView.alpha = 0
    }, completion: nil)
  }

  override func containerViewDidLayoutSubviews() {
    presentedView?.frame = frameOfPresentedViewInContainerView
  }

  override var frameOfPresentedViewInContainerView: CGRect {

    //1
    var frame: CGRect = .zero
    frame.size = size(forChildContentContainer: presentedViewController,
                      withParentContainerSize: containerView!.bounds.size)

    //2
    switch direction {
    case .right:
      frame.origin.x = containerView!.frame.width*(1.0/3.0)
    case .bottom:
      frame.origin.y = containerView!.frame.height*(1.0/3.0)
    default:
      frame.origin = .zero
    }
    return frame
  }

  override func size(forChildContentContainer container: UIContentContainer, withParentContainerSize parentSize: CGSize) -> CGSize {
    switch direction {
    case .left, .right:
      return CGSize(width: parentSize.width*(2.0/3.0), height: parentSize.height)
    default:
      return CGSize(width: parentSize.width, height: parentSize.height*(2.0/3.0))
    }
  }
}


// MARK: - Private
private extension SlideInPresentationController {
  func setupDimmingView() {
    dimmingView = UIView()
    dimmingView.translatesAutoresizingMaskIntoConstraints = false
    dimmingView.backgroundColor = UIColor(white: 0.0, alpha: 0.5)
    dimmingView.alpha = 0.0

    let recognizer = UITapGestureRecognizer(target: self, action:#selector(handleTap(recognizer:)))
    dimmingView.addGestureRecognizer(recognizer)
  }

  dynamic func handleTap(recognizer: UITapGestureRecognizer) {
    presentingViewController.dismiss(animated: true)
  }
}
//参考:<https://www.raywenderlich.com/139277/uipresentationcontroller-tutorial-getting-started>